


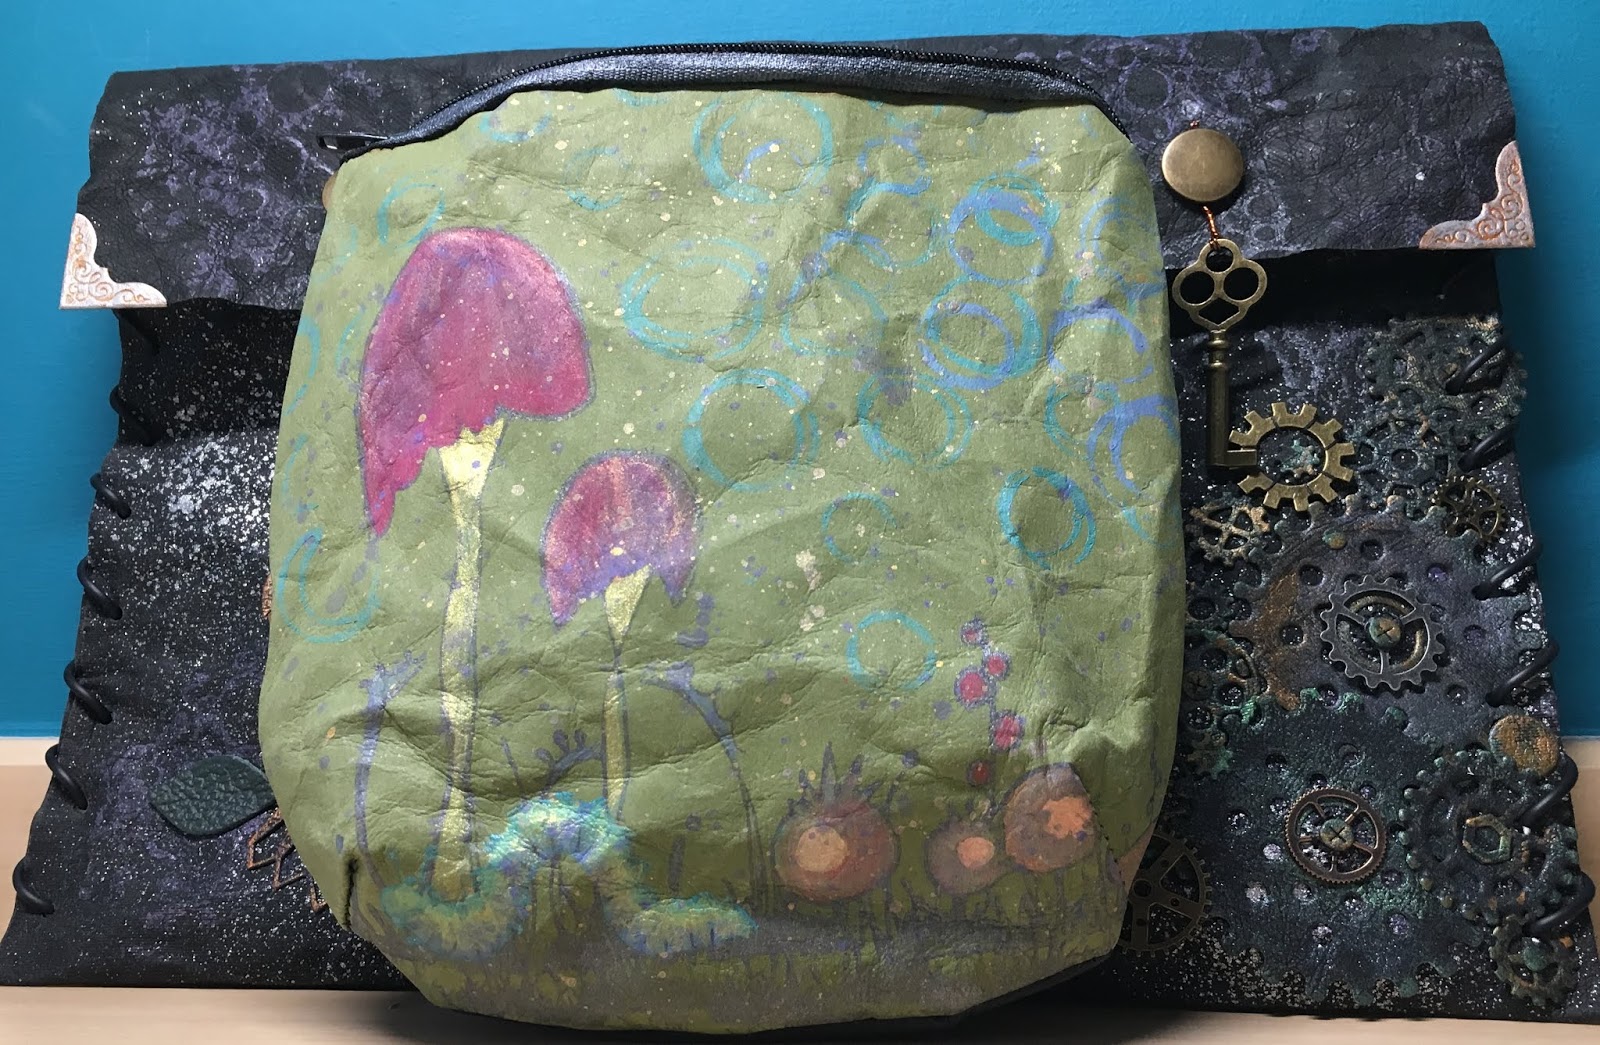
Faux leather paper tablet case
Firstly before cutting I wrapped a large piece of black faux leather paper around my tablet to get the size of it but also adding extra for the flap.
Washed at 40 degrees.
Scrunched it up when it came out of the washer then intermittently scrunching up then straightening it out, but not flat smooth.
Once dry n happy with leather effect I glued velour fabric to the inside of what will be the main body of the case. I left enough at sides so could I sew it (that was my intention!!!).
On the front of the tablet case I stamped a background of circle/bubbles using fabric paint and also spritzed with imagination crafts fabric guilt.
Then before I start adding more to the front I decorated the back with stamps, paint and stencil. I want the back ‘flat’ so I won't get annoyed when I put down on a surface and have to be careful of embellishments coming off or scratching the surface.
Using leather paper I cut an owl and cogs with metal dies and using my fingers painted various colours of fabric paint until I was happy with the effect.
The next few steps I would have done in a different order.
But, I went ahead and glued one side of the case. With intentions to sew over the top. I haven't used this glue before so that's why I only stuck down one side. Left it to dry.
I then arranged the owl and cogs on the case adding some brass cogs .
Once happy with lay out I glued them in place.
Which was a little tricky because of the uneven surface. Left them overnight under a heavy book.
The next day the brass cogs fell off!!! and some of the faux cogs hadn't stuck in places also the owl too.
Then what I thought would be easy is sewing the brass cogs in place. OMG what sore fingers I got!
The faux leather paper seemed to be tough to get through just like real leather. I was using an ordinary needle! NOW I know why they have different needles for different jobs. I’m sure with a leather needle it would be a breeze.
I did try pulling apart the glued side of the case but it was well and truly stuck which is good that it is a strong glue but would have made stitching the cogs easier if I could have opened up that side of the case!
After a few course words to self and very sore aching fingers I finished, fortunately I'm really pleased with the outcome.
I die cut some cogs from real leather so to give a different texture to the design.
I then Stamped a sentiment onto smooth green faux leather paper with fabric ink. Chopped it up and then arranged it on the case then glued in them in place and also gluing the real leather cogs too. Left them overnight under a heavy book.
I decided not to sew the sides, wasn't sure if my mums sewing machine would like the faux leather paper plus the glue.
So with my crop a dile I punched small holes evenly along both edges. Then using plastic jewellery thong I weaved it in and out. So pleased with the look.
I then added press stud fastenings, I hadn't used these before so that was another learning curve!
Wrapped some wire around brass keys then wrapped them around the studs to keep them in place.
Found some silver metal corners that I could put on the flap but firstly needed to make them look aged with paint.
I had some waste real green leather and they looked like leaves so glued them under the owl. Also glued the brass butterfly to finish the aged look of tablet case. Left them under a heavy book for a while so I knew that they would be well and truely stuck.
This was my 1st project with this substrate and I have really enjoyed working with it and the effect of leather but not being leather!
There are a few things I've learnt from this project and would change next time i use it; stamping and stencilling need less scrunch so to iron before starting. Think and plan when sticking and stitch which order to do them. Heavy book is essential for embellishments.
Fabric paint and ink seem to sink a little into the paper so in some cases more is better.
Speedball screen printing ink is brilliant as it doesn't seem to ‘sink’
Now onto next project. Watch this space.


Silver pencil pot
Used silver faux leather paper.
Pattern cut out done on my Silhouette Portrait ( used a design so that the ‘waste’ could be used on another project.
Base of pot cut from card with my Silhouette Portrait.
Glitter canvas from Craft Yourself Silly glued behind the cut out design.
Green and black pencil/makeup case
Pattern for the case cut on my Silhouette Portrait.
The green faux leather paper I washed and scrunched then ironed. Stamped design with fabric ink. Coloured with fabric paints.
Black/reverse of case - stamped with speedball screen printing ink (this didn't seem to ‘sink’ into the faux leather)
With my screen sensation I screen printed the feather with ‘Expandit’. Totally an experiment for me and it worked. Expandit ‘puffs up’ when heated and can be used on a multitude of surfaces, even fabric and washable. The feather looks and feels embossed.
The zip I painted so that it didn't look soooo nylon.
Brown case
Used 2 pieces of pre cut A4 faux leather paper.
Before washing I stamped on one A4 pieces with fabric ink then washed it. I wanted a faint background but maybe it's too faint!
I wanted to see if Heat transfer vinyl would work so I cut some skulls on my Silhouette and they stuck with no problem using my ‘Easy Press’.
The Big test was to see if they stayed on when washed and scrunched. The answer being YES.
Skull cut on silhouette, top bit of his head missing so I haven't stuck it on yet as I need to make him a top hat or a crown.
Next time I sew zips into my project I will try and conceal the zip. I've only just started sewing again. Last time I used a sewing machine would be about 40 years ago using the old black manual Singer Sewing Machine. Prior to doing these zips I had practiced ONCE! I really like to just get stuck in a project and learn as i go.
The photo with a group of different faux leather paper I made;
3D roses (metal die)
Silver flowers and cogs cut on my Silhouette, the ‘waste’ I can use on another project.
Embossed Black faux leather paper and silver too.
Light brown strip with ‘scale’ cut outs I will make into a wrist cuff.
Here are the instructions for faux leather paper/magic media;
Media Magic is a unique composite paper that performs like a fabric. It can be cut, sewn, washed and tumble dried like a fabric. It also die cuts like a dream with regular dies and can be glued on projects in the same way as card would be. It is lightweight, yet superstrong and biodegradable .It does not fray when cut.
It has so many uses including making bags and wallets for an eco-conscious, cruelty free alternative to leather (vegan leather)
To achieve the look of leather scrunch up the Media Magic tightly then place in a washing machine on a 40 degree wash, once washed scrunch again and dry in the Tumble Drier.This softens the paper and leaves creases like leather, you can repeat his process to further distress the paper.
Once dry you can iron the Media Magic using medium heat and no steam, place a tea towel over the top of the Media Magic, this does not remove the creases but "flattens" them so it is easier to work with.
Alternatively Media Magic can be scrunched and placed in a bowl of hot water before scrunching again and left to air dry, or tumble dried.
EXpandit 3D Expanding Fabric Medium
3D EXPANDING PUFF BINDER
Produces 3D effects on fabric, paper, card etc.
It can be applied straight from the container
without adding colour, heat cured and, once
expanded, gilded or painted etc. Alternatively, it
can be tinted with the Adva-Print concentrated
fabric colours, fabric paint or acrylic paint.
(Not suitable for mixing with lustre powders or
glitter)